Add SAML-based Apps to OneLogin
To add apps to your company app catalog, go to Applications > Applications > Add App and search for the app you want. Apps are automatically applied to the Default role so that any users added with that role will have access to the apps in the Company section of OneLogin.
To install apps now, select one of the following apps:
If you want to add a different app, follow these instructions.
Configuring SAML for G Suite
Important: When you enable SAML for G Suite, you enable SAML single sign-on (SSO) for all users within your organization. Therefore, we recommend that you first create a test domain to use when configuring SAML for G Suite before implementing in your live environment.
If you want to set up SAML for your production G Suite account, please contact OneLogin support.
This topic describes how to configure OneLogin to provide SSO for G Suite (formerly Google Apps) using SAML
Log in to your OneLogin account as an administrator.
Click Administration on the toolbar to go to the Admin panel.
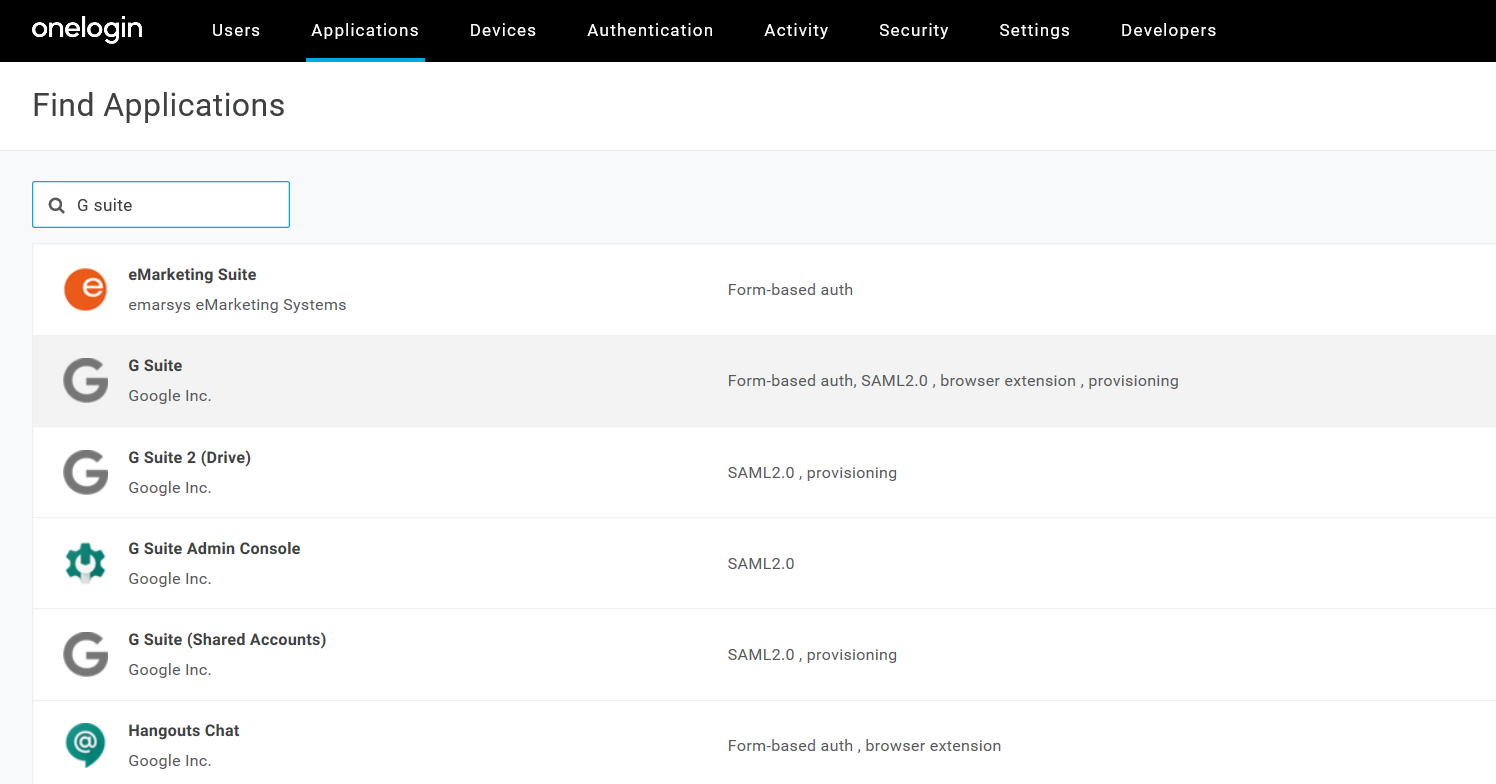
Go to Applications > Applications > Add Apps.
Type G Suite in the Search box.
On the Find Applications page, select G Suite: Form-based auth, SAML2.0, browser extension, provisioning.
You can change the Display Name.
In the Connectors section, make sure SAML2.0 - user provisioning is selected.

Click Save to display additional configuration tabs.
On the Configuration tab, enter your G Suite domain including the suffix (.com).
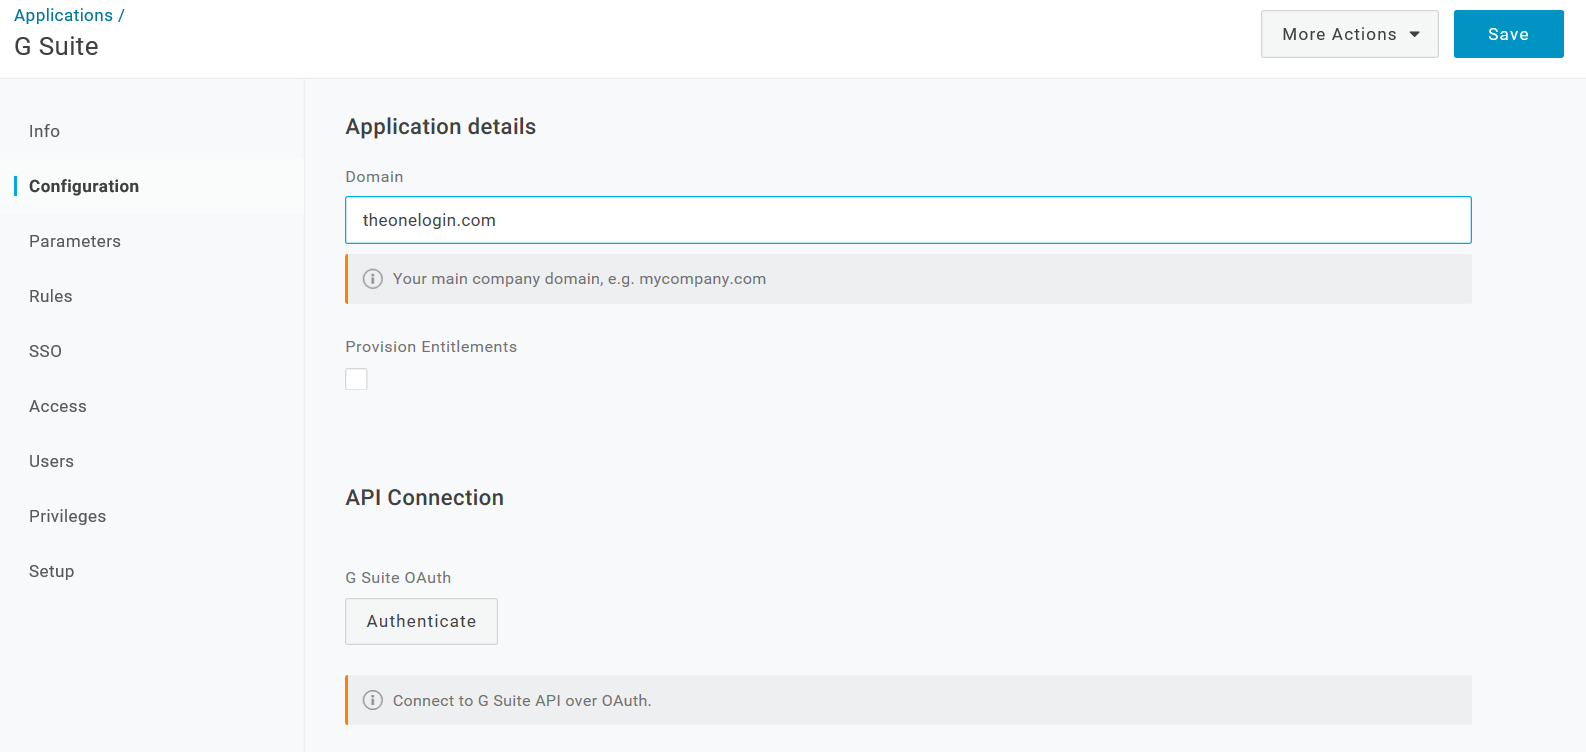
On the Configuration tab, authenticate to the G Suite API.
Note. Your G Suite APIs must be enabled in the G Suite admin console. See https://support.google.com/a/answer/60757.
- On the Configuration tab, click Authenticate.
- On the Complete Authentication Process dialog, click the G Suite link.
- Click Accept on Google's Request for Permission page.
OneLogin returns you to your G Suite app setup page and displays a brief message that your authorization was successful.
(Optional) You can confirm that the authorization was successful by going to the Configuration tab and confirming that the Clear Token button appears in the API Connection section.
Click Save.
You must save your settings here to enable the verification part of the SAML setup.
On the SSO tab, configure your SAML settings automatically with OneLogin’s One Click SAML setup.
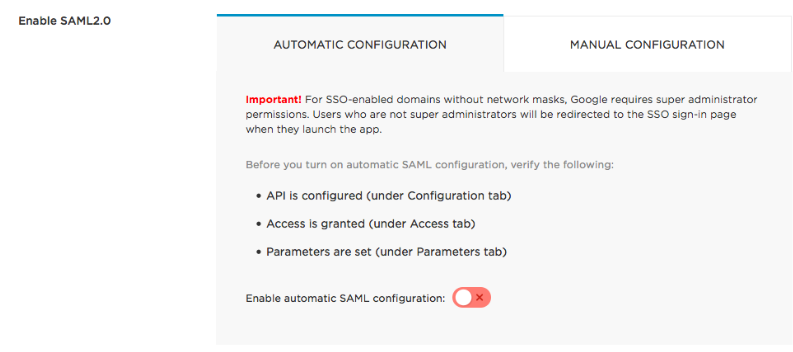
In this last step, you tell OneLogin to exchange certificates with G Suite and configure SAML automatically for you.
Turn on the Enable automatic SAML configuration toggle to open the One Click dialog.

Follow the prompts to complete the SAML configuration.
If SAML configuration fails the dialog lets you know, so immediately click Retry. If retrying fails, make any modifications suggested by the error message or check your settings on the Configuration, Access, and Parameters tabs and try again.
When SAML configuration succeeds, the dialog tells you it's done and prompts you to verify the configuration.
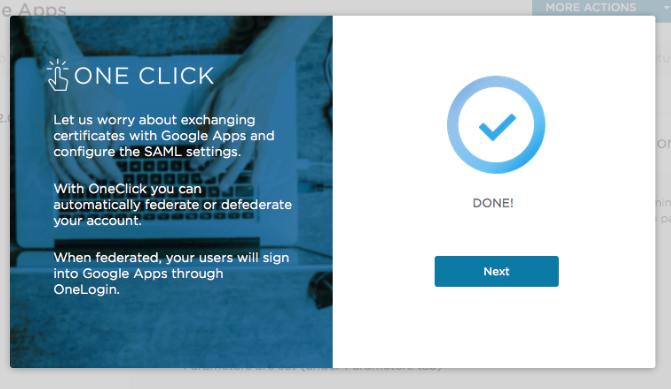
Verify that the SAML configuration has succeeded and that the OneLogin user can log into G Suite using OneLogin.
If you are logged in as a user with a G Suite account, and you are already assigned to this app in OneLogin (as a member of a role that you added on the Access tab, for example), the dialog displays a Verify button on the Done page. Click Verify to launch G Suite in another browser tab. If it works, you're done.
If you have not already assigned yourself access to this app, the Done page displays a Next button. Click it to display a verification page:
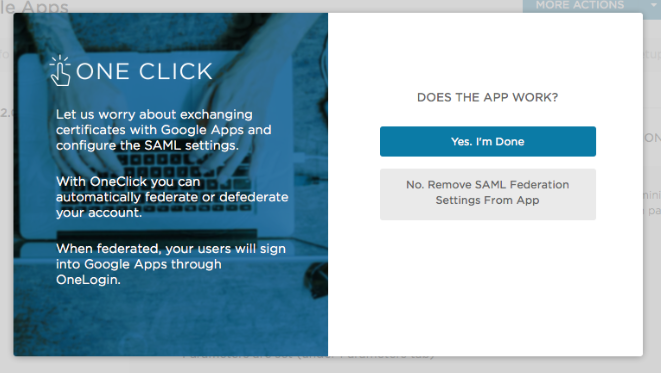
Open a new browser window or tab. Assign this app to a OneLogin user with a G Suite account, if you haven't already. Log in to OneLogin as the user and try to launch G Suite from App Home. If the app launches successfully, return to the One Click dialog and click Yes. I'm Done.
OneLogin returns you to the SSO tab, where you can confirm that the Enable automatic SAML configuration toggle is turned on.
OneLogin and G Suite should now be connected through SAML. If you want to turn off OneLogin SSO for G Suite, simply click the toggle off.
If you’ve been using OneLogin’s free 30-day trial, click here to learn how to buy OneLogin.
Back to Top
Add Salesforce to OneLogin
This topic describes how to configure OneLogin to provide single sign-on (SSO) for your Salesforce users using SAML. We recommend that you first sign up for a Salesforce Developer Edition account to use when configuring SAML for Salesforce.
Important: We recommend you set up SAML for Salesforce using the Developer Edition, as SSO can be set up for free and with a non-production environment.
Log in to your OneLogin account as an administrator.
Click Administration on the toolbar to go to the Admin panel.
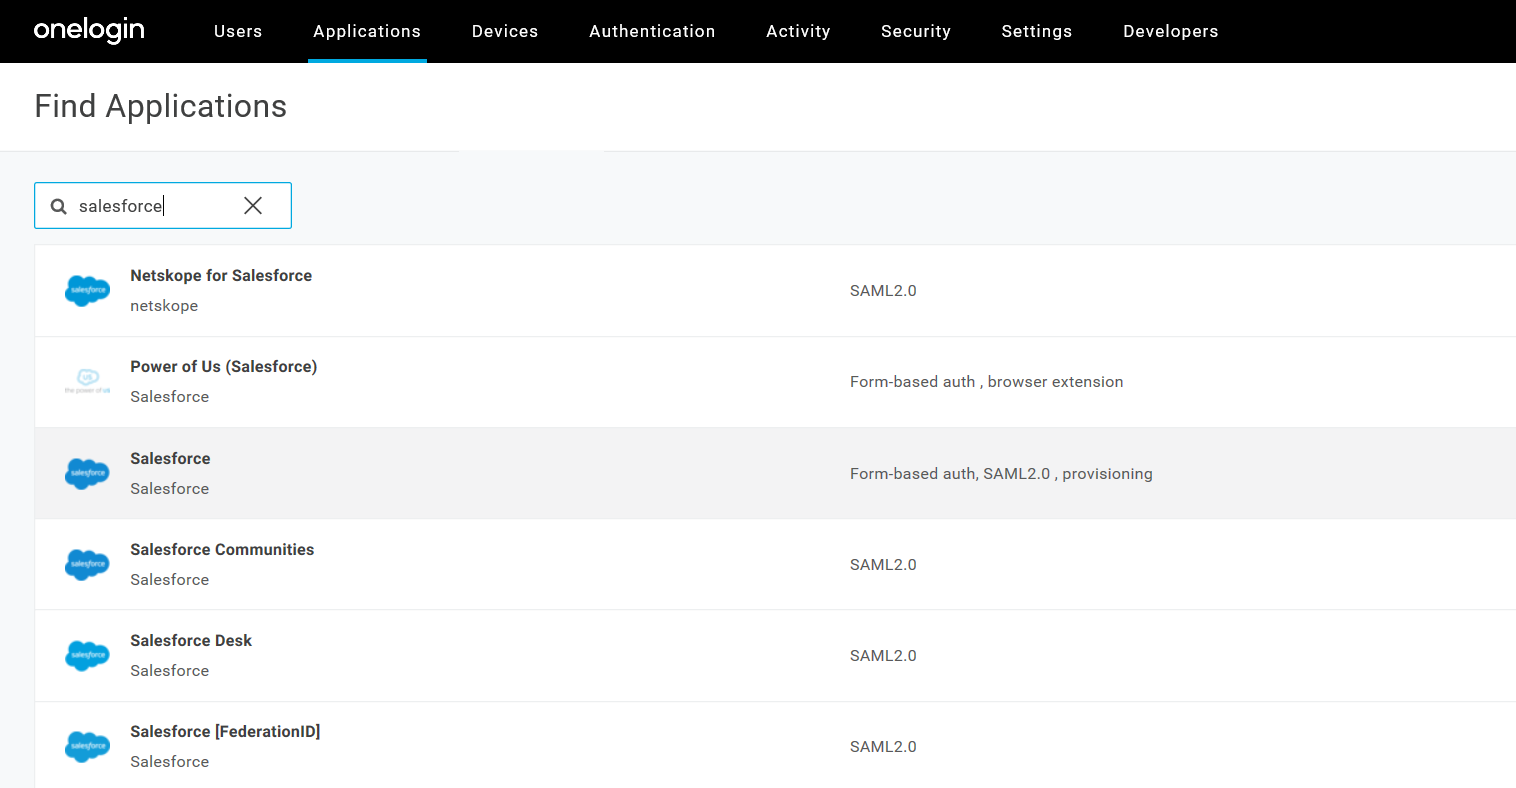
Go to Applications > Applications > Add Apps.
Type Salesforce in the Search box.
On the Find Applications page, select Salesforce: Form-based auth, SAML2.0, provisioning.
You can change the Display Name, and click Save.
The next steps require you to copy and paste values from OneLogin to Salesforce and vice versa.
You'll input the OneLogin Issuer URL, SAML 2.0 HTTP Endpoint, and X.509 Certificate in Salesforce to confirm the SAML SSO connection.
From the Salesforce admin dashboard, do the following:
In the Administer menu, go to Security Controls > Single Sign-On Settings.
Under Federated Single Sign-On Using SAML, select Edit, then the checkbox SAML Enabled, then Save.
Select New to create a Salesforce SSO profile.
On the SAML Single Sign-On Setting page, complete the form as follows:
Name: OneLogin
API Name: OneLogin
Issuer:
Issuer URL copied from your app's SSO tab in OneLogin
Entity
ID: https://saml.salesforce.com
Identity Provider
Certificate: Click Choose File and upload the
X.509 PEM file you downloaded from your app's SSO tab in OneLogin
Request
Signing Certificate: Default Certificate
Request
Signature Method: RSA-SHA1
Assertion Decryption
Certificate: Assertion not encrypted
SAML Identity
Type: Username
SAML Identity Location:
Subject
Identity Provider Login URL: SAML Endpoint URL
copied from your app's SSO tab in OneLogin
Identity Provider
Logout URL: -blank-
Custom Error URL:
-blank-
Service Provider Initiated Request Binding:
HTTP POST
Click Save
Select the Configuration tab.
In the "Salesforce Login URL" field, enter your Salesforce login URL.
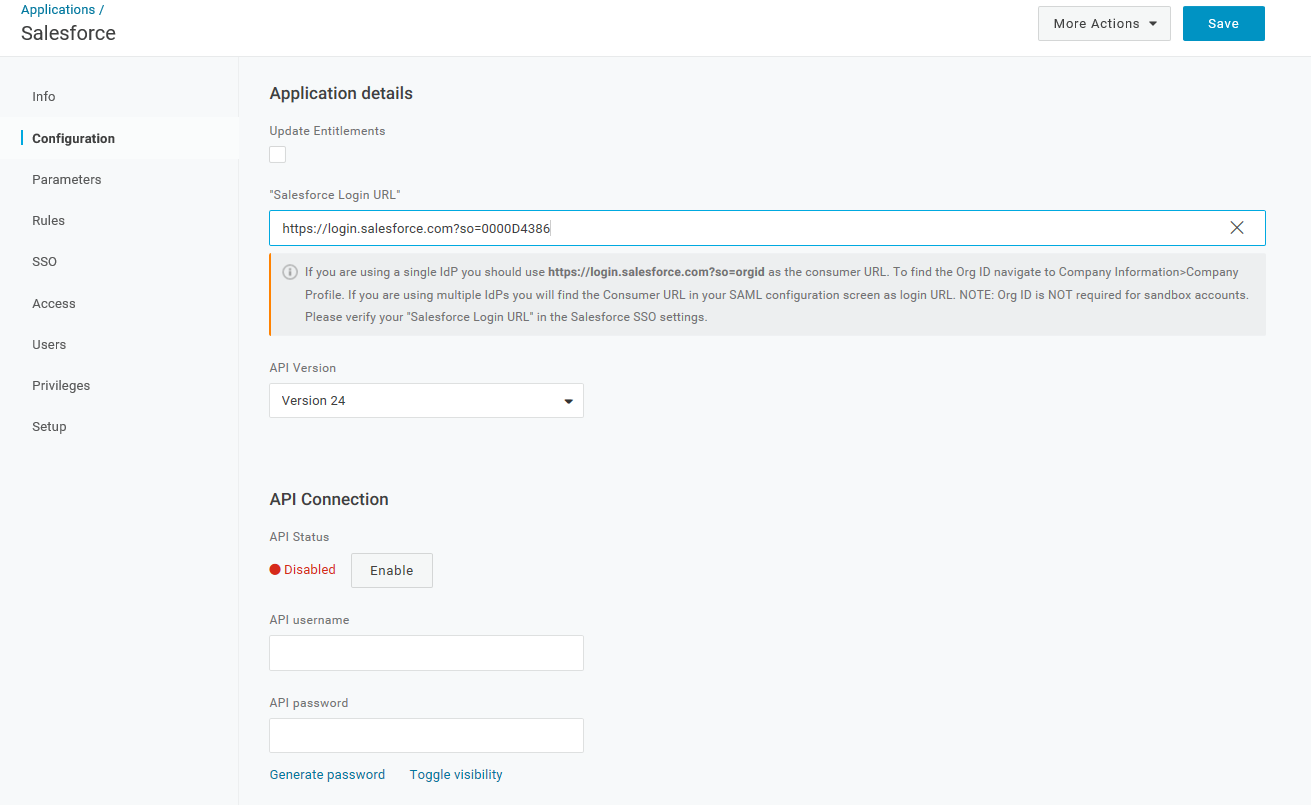
The URL will take the form of https://login.salesforce.com?so=. If you are unsure of your Salesforce Organization ID, go to Company Profile > Company Information within Salesforce to find it.
Click Save
Select the SSO tab.
Copy the SAML2.0 Endpoint (HTTP) URL.
Copy the Issuer URL.
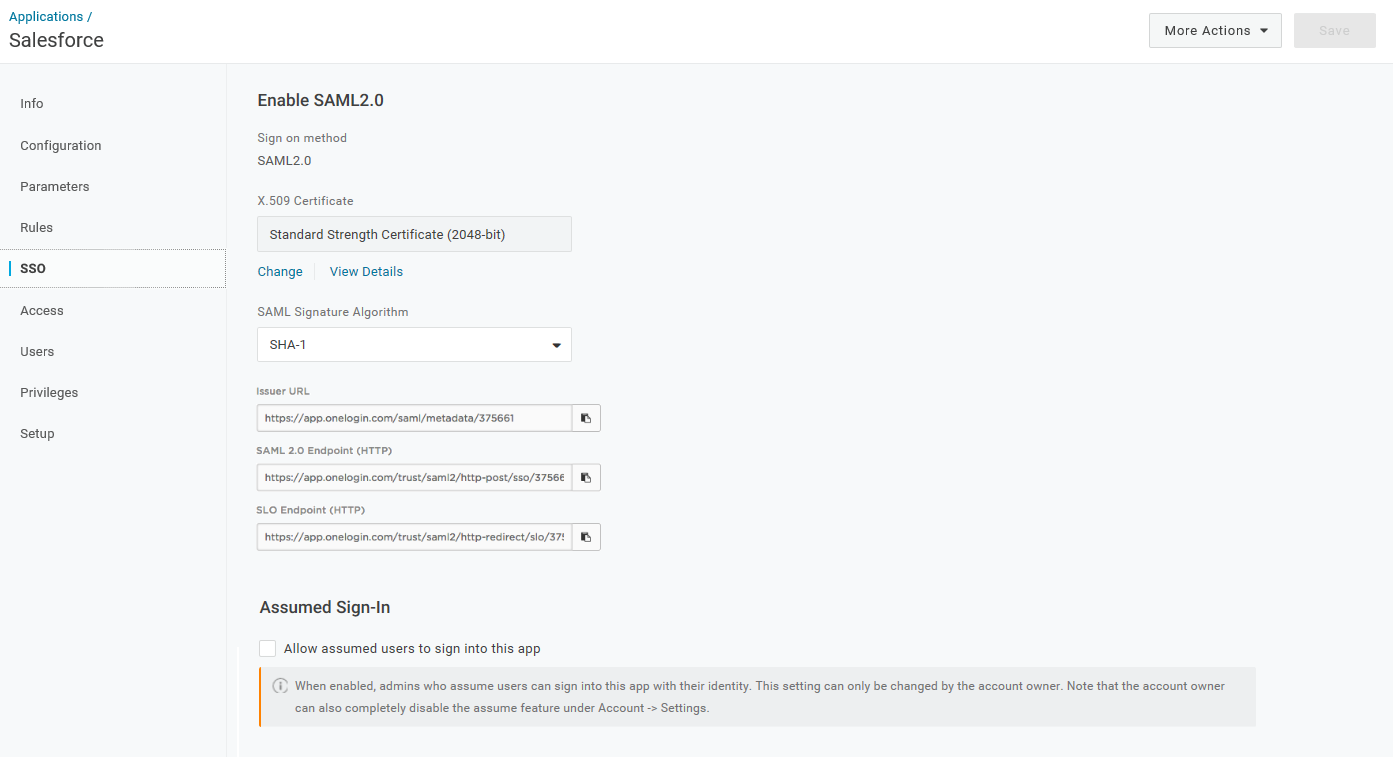
Select View Details on the X.509 Certificate.
Select X.509 PEM as the certificate type.
Click Download to download the X.509 PEM certificate file.
Troubleshooting an Email Mismatch
In some cases, the Salesforce account admin email may not match the OneLogin admin email. This can be remedied by doing the following:
In OneLogin, go to Users and select the account owner.
Select the Applications tab
Select the Salesforce app to open the Edit Salesforce Login pane.
Here you can overwrite the default fields for your Salesforce login and insert the correct information to match your OneLogin credentials with your Salesforce credentials.
Back to TopIf you’ve been using OneLogin’s free 30-day trial, click here to learn how to buy OneLogin.